4.2. Adding product data
4.2.1. Creating a new category
All products must belong to at least one category, so before you
can add any products, you should create the categories
required.
If you intend to have a 'shop by category / shop by brand' option, then you should start with just two top level categories (one for each) and nest everything else inside those. Remember that products can have multiple parent categories, so any product can be in both sections (or subcategories within them).
To add a new top level category, go to 'Products > Add New Category'.
Alternatively, you can list the top level categories with the 'categories' icon next to the home button on the left hand menu, then click the 'new' link to the top right of this page. If you want to create subcategories, navigate to the parent category where you want to place the subcategory, and then click the 'new' link. This will pre-fill the 'parent' category into the form.
4.2.2. Creating a new product
If you are creating an 'options' product, then you will need to
create the options first.
Then you can either go to 'Products > Add New Product', or you can click the 'New' link next to the products section in a category view. This will bring up the product editor page.
Then you can either go to 'Products > Add New Product', or you can click the 'New' link next to the products section in a category view. This will bring up the product editor page.
4.2.2.1. Category parent
Each product must belong to at least one category. In such
cases, the category that a product belongs to is called its
'parent'. To select a category, enter the name (or part of the name)
in the single line text box of the 'category parent' section. A list
of matching categories will spring up. Select the appropriate one
and hit the 'Add' link next to the box. The category will be added
in the box above.
Kartris supports multiple category parents. You can use the same process to add further categories. All the categories that a product belongs to will be listed in the multiple dropdown.
To remove a category from being a parent of this product, simply highlight it in the multiple dropdown list and click the 'Remove selected' link.
These product-category relationships will only be saved when the product is updated/created with the 'Save' button.
4.2.2.2. Product type
There are three selectable types of product – single version,
multiple version and options product. These are explained further in
@4.1.4. Product types.
When you select the product type, some of the dropdown menus immediately below will be enabled or preset to certain values and disabled. This is because certain selections of these only apply to certain product types.
If you are editing an existing product, and find that you are not permitted to change the product type, it is most likely because the product has associated data which is incompatible with the other product types. For example, if you have a multiple-version product, it cannot be changed to a single version or options products without first deleting the extraneous versions.
4.2.2.3. Product not visible warning
After creating a new product, you will see a warning at the
top of the page that the product is not live on the web site because
there are no versions live.
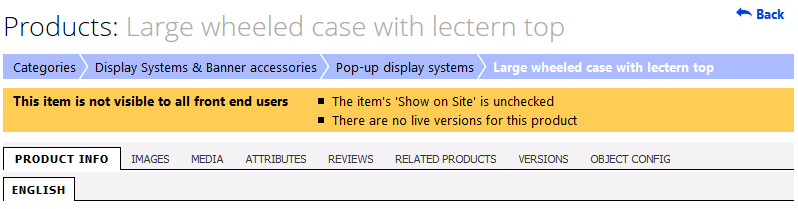
This makes clear if there are any reasons why the product
being viewed is not visible from the front end of the web site. The
reasons include:
- No valid live
version
- Product
is disabled ('show on site' checkbox
unchecked)
- Product
belongs to a customer group (in this case, the warning
makes clear that the product is only visible to members of that
group, and not the wider
public)
- None of the parent categories are live
4.2.2.4. Creating a version
In Kartris, every product must have an least one 'version'
under it. A version is the record that contains the price, tax rate,
SKU (unique item code), item weight and stock quantity
information.
If you create a 'single version' product, a new version is automatically created. However, you must still go to the 'versions' tab in order to enter a price and other minimum information, as well as to set the new version live.
For other product types, you must also create at least one version before the product is complete and can be visible on the front of the web site to be purchased.
4.2.2.4.1. RRP
RRP, or recommended retail price, let's you display a guide
price on your site for the manufacturer's recommended pricing,
typically in order to demonstrate how much cheaper than the norm
your price is.
To activate this, you must first turn the RRP display on with the frontend.versions.display.showrrp config setting, then you can set a value for RRP for each version. Note that this only shows on some version types; options products do not display this for example, because the price of options products is not fixed - and providing an RRP for each permutation of options would be unnecessarily complex for what is essentially just a guide and marketing device.
To activate this, you must first turn the RRP display on with the frontend.versions.display.showrrp config setting, then you can set a value for RRP for each version. Note that this only shows on some version types; options products do not display this for example, because the price of options products is not fixed - and providing an RRP for each permutation of options would be unnecessarily complex for what is essentially just a guide and marketing device.
4.2.2.5. Finding and viewing versions
Versions can be reached in a number of
ways.
You can navigate the category structure and see products listed; clicking the [+] sign to the left hand side of the product name will expand the product so that its versions are visible.
Versions can also be found from the search box in the Kartris back end. When editing a product, you can switch to the 'versions' tab to see all versions listed.
4.2.2.6. The 'Images' tab
Kartris products can have unlimited images. To add an image
for a product, click the images tab and then 'Add
new'.
Hit 'Browse' and navigate to an image on your local computer. Ideally, this image should be sized already for use as a 'large view' image on your site. Typically this would mean JPEG format (.jpg extension), no more than 600 pixels in each direction, and below 100KB in size. Once selected, click the 'upload' link to the left of the browse box. The image should appear in the list.
Don't worry if it appears slightly distorted or squashed; this back end view is not how the image will appear on the front end; it is just a rough thumbnail that will be made square here. On the front end of the site, the image aspect ratio will be maintained, and it will be reduced in size where necessary for use as various sized thumbnails, normal sized view, and large view.
You can upload multiple images one by one. They will appear here as a list. The image order can be changed using the up/down buttons, or it can be deleted.
Where there are multiple images, the first will be used for the product on the front end of the site. On the product page itself, the first image will display larger, while the others will be thumbnailed below in a gallery. A large view feature is automatically provided.
If no image is included, a place-holder image may be displayed on the front end instead, depending on the frontend.display.image.products.placeholder config setting.