4.5. Product attributes
Attributes are entered at product level, so if you have multiple versions or an options product, care should be taken to ensure that the attributes apply to the product in general, including all versions.
4.5.1. Attributes vs. options
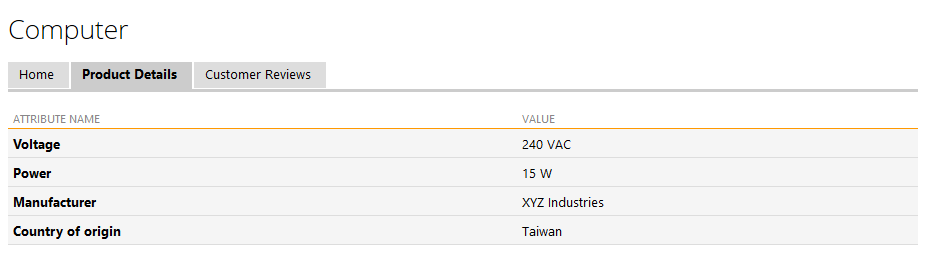
Attributes are sometimes confused with 'options', but they are quite different. Options are choices that are available to a customer to select when choosing a product. Attributes on the other hand are fixed pieces of information that apply to the product and cannot be selected or deselected by a customer.
To give an example of usage, a book might have a number of attributes:
ISBN (unique book number that all books have)
Publisher
Author
Genre (thriller, romance, non-fiction, etc.)
Format (hardback, paperback, audio book, e-book)
Once created, you can enter the information for each and every book you feature on your site (although there is no requirement to enter any attributes for any item where you don't wish to).
4.5.2. Creating attributes
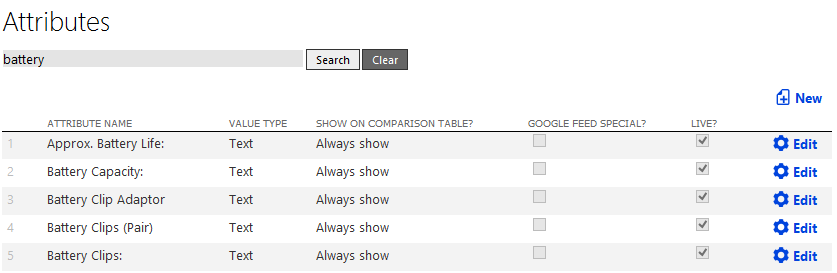
Go to 'Product > Product Attributes'. A list of all current attributes appears. You can click to create a new attribute, or edit an existing one.
Attribute type is fixed as 'text', but other types may be supported in future.
You can control if the attribute is displayed in the product page from the checkbox – unchecking the box means the attribute is hidden from displaying there.
If all the attributes of a product are hidden in this way, the 'product details' section on the product page will be hidden.
You can control whether an attribute is searchable too, with the 'include in search' checkbox. For example, you might not want voltage to be searchable, but you would most likely want the author attribute for a book to be searchable, or the ISBN number, as customers are very likely to use these to find particular items.
The final option is 'Show on comparison table'. This sets the circumstances under which the attribute will be displayed when comparing products.
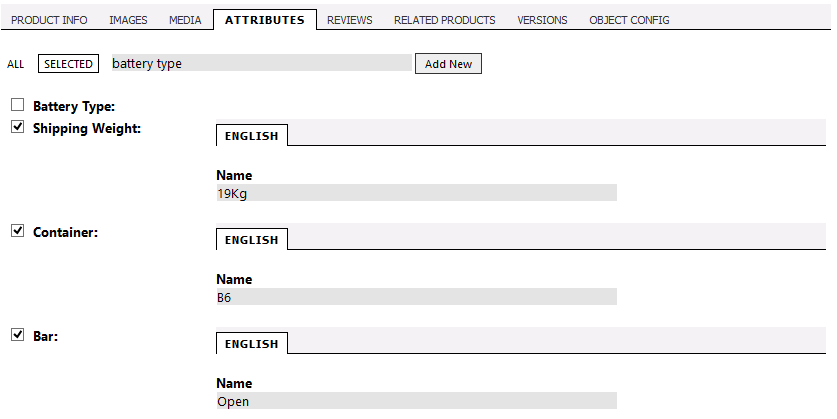
4.5.3. Setting attribute values at product level
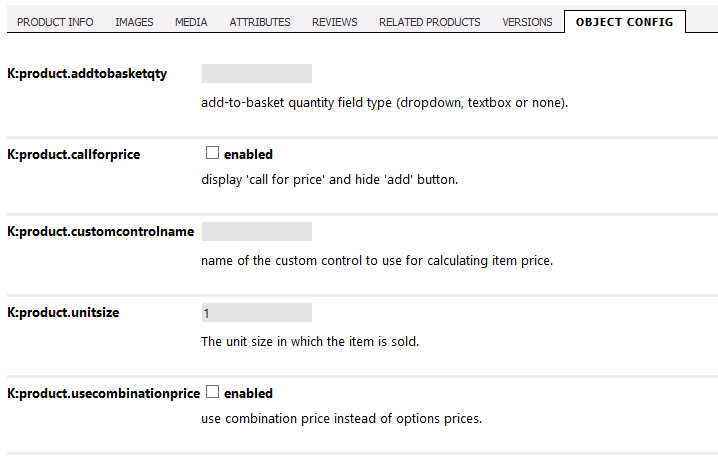
4.5.4. Object config
To retrieve the value in code, just call it like this:
ObjectConfigBLL.GetValue("K:product.addtobasketqty", 99)
4.5.4.1. K:product.addtobasketqty
This controls the display of the 'add to basket' region of the product. The valid values are:
- 'dropdown' - a select menu
numbered from 1 upwards (to a number set in
frontend.basket.addtobasketdropdown.max) displays
just in front of the 'add' button so a customer can select a
quantity and then add that number of items to the basket; this is
most appropriate where users will only ever purchase a small number
of similar items.
- 'textbox'
- a free text field where the customer can enter a quantity and then
click 'add'.
- 'none' - no quantity selection, just an 'add' button which adds a single item to the basket; this is most appropriate for big ticket items or customizable items where a customer is only ever likely to order one.
It should be noted that a customer can still edit the quantity of items as free text within the basket page, or click multiple times to add further items, so this setting does not create any limitation on what a user can checkout with.
Where no value is entered, the
product will default to use the
frontend.basket.addtobasketdisplay config setting
value. So you should set that to act globally on your store, and
then use this object config value on a per product basis to override
it for particular items if desired.
4.5.4.2. K:product.callforprice
4.5.4.3. K:product.customcontrolname
Custom controls is an advanced developer topic. It is a prototype system that allows the normal product 'add item' section for a specific product to be replaced by a custom user control. The control can handle all the logic of displaying options, accepting text input, looking up prices from a web service or spreadsheet or new database table, making calculations and formulating the price and description of an item which can then be placed into the standard Kartris basket. This permits total flexibility in the kind of products Kartris can handle, with total freedom for skilled developers to create complex configuration tools for products. It's particularly useful for handling custom measured items such as curtains, signage, boxes, etc. where the price can be a factor of multiple dimensions which themselves have 100s or 1000s of possible values. In these cases, it's simply not possible to use options.
This object config setting holds the name of a control in the /UserControls/Custom/ folder that this product should use, for example 'SampleCustomControl.ascx' (which we include as a sample in the core Kartris zip).
4.5.4.4. K:product.unitsize
But for some items, you may want to change this. If you sell cloth for example, it may be that you price it in metres, but can provide it in any length to the nearest centimetre. In this case, you can set the 'unitsize' object config for this item to 0.01 (1cm = 0.01m, the unit you're pricing in).
It can also work in the other direction. If you sell screws or bolts, you may price them individually, but being small items, only provide them in multiples of 50. In this case, you can price the item per piece, but set the unit size to 50.
The unit size can be any value, you could set it to 12 if bread rolls are priced individually but only available in 'dozens' or 0.25 if you price an item in kilograms but actually deliver it in multiples of a quarter kilo.
If a user tries to add an incompatible quantity, either from the product page, or by editing quantities in the basket, a warning is displayed indicating that the item can only be ordered in multiples of whatever value you have set.
4.5.4.5. K:product.usecombinationprice
By setting the 'usecombinationprice' object config on, you can price the individual combinations you create for a product without this being calculated by the base price plus/minus any option price modifiers.