13. Skins and Visual Design
This sections contains a lot of information intended for
developers using the Kartris software. While it is possible for users
who are relatively tech savvy (familiar with HTML and CSS) to skin their
own site, the majority of end users will benefit from hiring a web
developer to do this for them.
A developer should not necessarily require either specialist Kartris or ASP.NET knowledge to develop a skin for Kartris, though use of, or access to a Windows computer with Kartris installed and running is essential in order to test the skin with Kartris.
A developer should not necessarily require either specialist Kartris or ASP.NET knowledge to develop a skin for Kartris, though use of, or access to a Windows computer with Kartris installed and running is essential in order to test the skin with Kartris.
Every site will want to customize the appearance to some degree,
even if just to change default colours and add an appropriate logo.
Kartris groups elements that control appearance across the site into
'skins', which can be found in the /Skins folder within
Kartris.
13.1. Required skins
Every Kartris must have at least two skins - one called 'Kartris'
which is the default front end skin. And another called 'Admin' which is
used by the back end admin area. You can also add new skins to change
the appearance of the front end.
If you wish to support browsers below IE8, and have a modern responsive skin on your site, you can also add a non-responsive skin for older browsers. Please see @14.3.3. Old IE support.
If you wish to support browsers below IE8, and have a modern responsive skin on your site, you can also add a non-responsive skin for older browsers. Please see @14.3.3. Old IE support.
13.2. Setting a skin
To choose a skin for your site, go to 'Regional Setup
> Lang & Email Setup' and choose which language
you want to set the skin for. In the form that opens, you can the skin
from the 'theme' menu. If there are multiple masterpages in the skin,
you can choose one of those too.

If you leave either selection blank, Kartris will use the defaults
(which are the skin 'Kartris' and the
'Template.master' template
file).
This menu automatically picks up any new folders added to the /Skins folder within a Kartris site. So all you have to do to import or create a new skin is to place the new folder there and then select it from this menu.
This menu automatically picks up any new folders added to the /Skins folder within a Kartris site. So all you have to do to import or create a new skin is to place the new folder there and then select it from this menu.
13.3. Skin components
A typical skin folder will contain a selection of files and
folders. The exact number of files and folders can vary, but the default
skin in Kartris will look something like this:
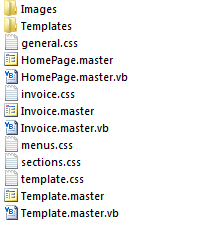
The Template.master is the key template file;
this contains the HTML structure of the site layout, and contains links
to the various stylesheet and image files. Every skin must have a
Template.master
page.
HomePage.master is an optional file. If present in a skin, the home page of the site (Default.aspx) will use this template instead of the main Template.master file. It is quite common for sites to have a different layout on the home page to that used throughout the rest of the site, hence this feature. It is however possible to use different templates for various other parts of the site too. More details later in this section.
The .css files are cascading-stylesheet files. These control the styling of the various page elements that make up a Kartris page, such as fonts, colours, the position of the various layout columns, the width of the page and so on. CSS is a web standard way of formatting web pages, it isn't proprietary to Kartris. There is a vast amount of information on the web about using CSS. In our skins, we tend to divide the CSS up into several files:
- template.css
- controls the position of various page elements within the
Template.master
page
- general.css
- sets the appearance of fonts, form controls and various other elements
used throughout
Kartris
- sections.css
- controls the appearance and layout of various elements used in
particular parts of Kartris, such as the layout of products and the
checkout
- menus.css
- controls the appearance of menu systems such as the dropdown
navigation menu and the categories
menu.
The Images
folder holds images used within the CSS (background images) as
well as the site logo and any other images embedded within your
.master templates.
13.3.1. The 'Templates' folder
Some payment systems allow you to serve back HTML in response to
a callback. For some, the HTML served back should be nothing more than
a simple message, which they will insert into the confirmation page
they show to users. For others, the callback page should serve back
the full HTML of a page that they will relay to
customers.
In order to handle this, HTML templates can be added here. Kartris will look for these automatically in the live skin, based on the following naming criteria:
Callback_[name].html
Where [name] is the name of the payment system's folder in the /Plugins folder of Kartris. Not all payment systems can return HTML from the callback to the customer, so this feature only works where the payment system supports it.
A simple callback template will look as follows:
			<html>
<head>
	<title>Order Confirmation</title>
</head>
<body>
[orderdetails]
</body>
</html>
The [orderdetails] tag is where the text
summary of the order contents will appear. If no template is present
in the skin, the order details will appear on their own, without any
skinning.
13.3.2. Invoice.master
13.4. Skin config file
For certain web sites, you may want particular categories or
products to use a different skin to that of the main site. This allows
you to create a completely separate look and feel for a part of your
site selling a particular brand, for example. Or you may want to brand
the site for a particular customer, so major customers have their own
customized version of the site.
This can be done through a Skins.config file added into the /Skins folder. It looks something like this:
This can be done through a Skins.config file added into the /Skins folder. It looks something like this:
			<?xml version="1.0" encoding="utf-8" ?>
<configuration>
	<CustomerSkinRules>
		<Customer ID="123" SkinName="DifferentSkin"/>
	</CustomerSkinRules>
	<CustomerGroupSkinRules>
		<CustomerGroup ID="456" SkinName="AnotherSkin"/>
	</CustomerGroupSkinRules>
	<ProductSkinRules>
		<Product ID="789" SkinName="SkinNumber3"/>
	</ProductSkinRules>
	<CategorySkinRules>
		<Category ID="100" SkinName="BlackAndOrange"/>
	</CategorySkinRules>
	<ScriptSkinRules>
		<Script Name="Basket.aspx" SkinName="BasketSkin"/>
	</ScriptSkinRules>
</configuration>
You can add multiple tags into each section.
Note: The tags in the
Skins.config are case sensitive. If settings are
not working as expected, check the case of tags carefully to ensure
tag names and values match those above.
13.5. Setting a page's masterpage
Pages within Kartris have a default masterpage set in the block
right at the top, for example the Product.aspx page
which displays a product has this at the top:
			<%@ Page Language="VB" AutoEventWireup="true" MasterPageFile="~/Skins/Kartris/Template.master"
    CodeFile="Product.aspx.vb" Inherits="Product" %>
If this is unchanged, then Kartris will enforce the various skin
rules to determine which skin to use. This means looking at the
Skin.config file (if present) and the choice of skin
set in the Kartris back end. However, if this code is changed to point
to another .master file, Kartris will use that
instead and not run the various rules. So if you want to set all
products to use a different .master page, you can
edit this code at the top of Product.aspx to achieve
this.
13.6. Menus
13.6.1. Product categories
There are three different types of product category menus that
Kartris comes as standard with. The most commonly used is the default
CSS fold out type that our demo uses. It is also possible to use an
accordion type menu, or a select/dropdown menu. Our demo zip includes
a skin which uses an accordion control. It is possible to change the
control reference within this skin's .master file to use the
select/dropdown menu too. The following shows the different code for
each:
			<user:CategoryMenu ID="UC_CategoryMenuCSSFoldout"
  runat="server" EnableViewState="False"
  Visible="True" />

<user:CategoryMenuAccordion ID="UC_CategoryMenuAccordion"
  runat="server" EnableViewState="False"
  Visible="True" />

<user:CategoryMenuDropDownSelect ID="UC_CategoryMenuDropDownSelect"
  runat="server" EnableViewState="False"
  Visible="True" />
At default, the category menu will build up from the root of
your category structure, including all categories. In some cases, you
may want to have two or more category menus on your page, with each
using a specific category as a root. For example, if you have two top
level categories 'Shop by Brand' and 'Shop by Type', you may prefer to
have these as two distinct menus in different locations on the page.
To achieve this, you can set the root category for a category control,
like this:
			<user:CategoryMenu ID="UC_CategoryMenuCSSFoldout"
  runat="server" EnableViewState="False"
  RootCategoryID="1" Visible="True" />

<user:CategoryMenu ID="UC_CategoryMenuCSSFoldout2"
  runat="server" EnableViewState="False"
  RootCategoryID="2" Visible="True" />
The RootCategoryID is set to either 1 or 2 (in order to use the
Categories with IDs 1 and 2 as the base for each menu. Also note that
both controls have different IDs; these are largely arbitrary, but
must be different. You will generate an error if you try to have two
controls with the same ID on a page.